
Ever wish a site had a keyboard shortcut? Me 🙋🏻♀️, every time I press the right arrow key in Google Calendar and sigh in frustration when the site doesn’t navigate to the next week. This seems like such an intuitive shortcut: use the arrow keys to browse forward and backward in time. It’s so intuitive that I forget it doesn’t actually exist natively.
Finally, I decided I’d hack this shortcut in. How? Chrome extensions.
In this post, we’ll be adding arrow key navigation to GCal. This process can be extended to any site, with (almost) any keyboard shortcut!
Prereqs
This tutorial assumes you have some knowledge of Javascript and how the DOM works. All good? Let’s get started 👍🏼
Implementation
0. Getting Started
Creating a Chrome extension from scratch is actually ridiculously simple. Much like how every npm project requires a package.json, every Chrome extension needs a manifest.json for important information. This file goes in the root directory. We’ll add some bare-bones details first:
| { | |
| "name": "Google Calendar Navigation Shortcuts", | |
| "version": "1.0", | |
| "description": "Add arrow navigation to Google Calendar", | |
| "manifest_version": 2 | |
| } | |
Chrome recommends that developers put 2 for the manifest_version so that’s what we’ll do.
Next, choose an icon for your extension! I just downloaded the GCal icon and put it in a folder called assets. While you should have a different sized icon for each of the specified dimensions, for now, we’ll just use the same icon for all. We’ll also add some permissions. We only want the extension to run on pages prefixed with https://calendar.google.com so:
| "icons": { | |
| "16": "assets/icon.png", | |
| "48": "assets/icon.png", | |
| "128": "assets/icon.png" | |
| }, | |
| "permissions": ["https://calendar.google.com/*"], |
With our manifest.json, we can set up the development environment.
Head over to chrome://extensions in your address bar. Toggle “Developer Mode” so that it’s on. Then click “Load Unpacked” and select your extension directory. You should see your extension with the details and icon show up as a new card:
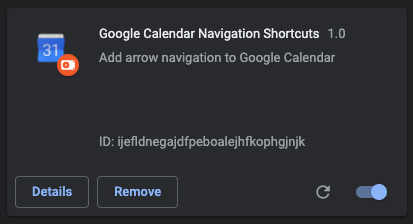 chrome://extensions
Your ID might be different but that’s fine.
Every time you make changes to your extension, you just have to press the refresh icon in the bottom right corner to “recompile”.
If you head over to https://calendar.google.com and click on the puzzle piece icon on the right of the address bar, you should see the extension listed under “Full access”. If you go to another random page, the extension should instead show up under “No access needed” — this is your permissions working.
Yay, now we have a dev environment set up and can dive into the actual coding part.
1. Content Script
Content scripts interact with the DOM. In this case, we want the content script to traverse the DOM, local the arrow divs, and click on them when the shortcut keys are hit.
Under a new folder called js, create a new file called contentScript.js. We need to register this file in manifest.json. Under the "content_scripts" key, we also need to specify "matches" which determines what pages the content script is allowed to run on:
| "content_scripts": [ | |
| { | |
| "matches": ["https://calendar.google.com/*"], | |
| "js": ["js/contentScript.js"] | |
| } | |
| ], |
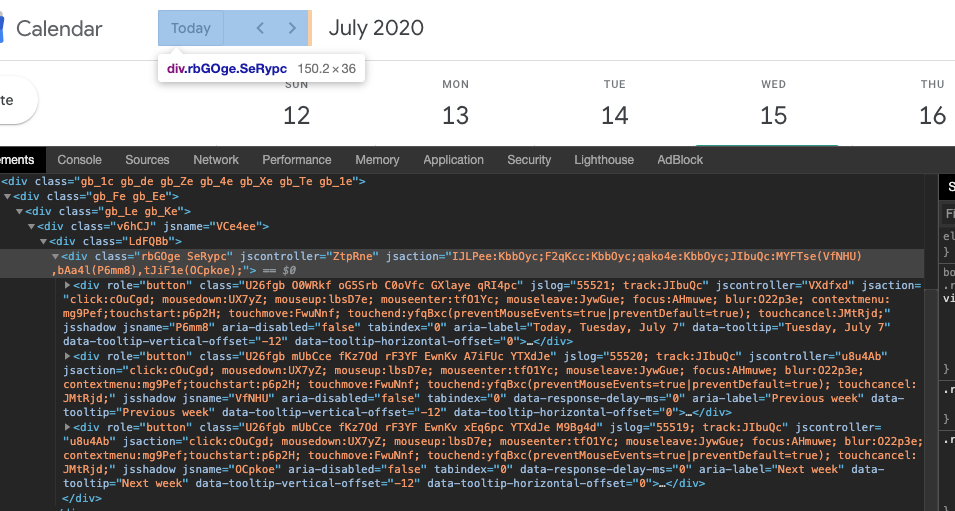
Cool. We can now investigate the GCal DOM. By opening Inspect Element, we find that the two arrows are wrapped in divs with 7 classes…It looks like it’d be cleaner to access the parent div which only has 2 classes and iterate through the children.
 Parent container is highlighted
We can use getElementsByClassName and access the parent container’s 2nd and 3rd children which are the arrow divs that we want:
| const container = document.getElementsByClassName('rbGOge SeRypc'); | |
| if (container) { | |
| const containerChildren = container[0].childNodes; | |
| const leftArrow = containerChildren[1]; | |
| const rightArrow = containerChildren[2]; | |
| } |
Our content script looks good for now. We gotta hook up some other stuff before we can click these arrow divs.
2. commands API
For security reasons we can’t just add document.addEventListener('keydown', handleKeyDown) in our extension. Imagine if extensions became malicious keyloggers…
Instead, we’ll be using Chrome’s commands API. This allows us to register keyboard shortcuts with our extension. All we gotta do is add to our manifest.json:
| "commands": { | |
| "navigate-left": { | |
| "suggested_key": { | |
| "default": "Alt+Left", | |
| "mac": "Alt+Left" | |
| }, | |
| "description": "Navigate Left" | |
| }, | |
| "navigate-right": { | |
| "suggested_key": { | |
| "default": "Alt+Right", | |
| "mac": "Alt+Right" | |
| }, | |
| "description": "Navigate Right" | |
| } | |
| }, |
A couple of notes:
- The command must consist of at least two words separated by a dash like
"navigate-left". It just won’t work with only"left". - We have to specify a
"default"and"mac"under"suggested_key", because Macs have the command key which the equivalent to Ctrl. - The documentation specifics that the shortcut must include the
Alt(optionon Macs) ORCtrl/Command. So here, we choseAlt + Left/Right. We also have to make sure the command does not conflict with current Chrome/computer shortcuts. This is whyCommand/Ctrl + Left/Rightis not a good idea.
Once we add these lines, refresh the extension in chrome://extensions. Then if you head to chrome://extensions/shortcuts, you should see the commands we just registered:
 chrome://extensions/shortcuts
You’ll see that the shortcuts have the suggested keys that we declared above in manifest.json but you can override them using this interface to whatever combination you want.
3. Background Script
Background scripts run in…well, the background of the extension. In this case, we want our background script to listen to command events.
Create a file under the js folder called background.js and let’s register it in manifest.json:
| "background": { | |
| "scripts": ["js/background.js"], | |
| "persistent": false | |
| }, |
Chrome documentation says that "persistent" should almost always be set to false so we’ll oblige.
Next, we’re adding a command listener and parsing which direction the command is specifying:
| chrome.commands.onCommand.addListener(function (command) { | |
| const direction = command.split('-')[1]; | |
| }); |
Every time Alt + Left/Right is pressed in GCal, the background script grabs the direction entered.
4. Messaging
In this extension, the background script listens to command shortcuts from the keyboard. When it detects a command, it passes a message with the direction to the content script.
So in our command listener, we use chrome.tabs to send a message with the key direction that stores the direction we grabbed from the command name:
| chrome.commands.onCommand.addListener(function (command) { | |
| const direction = command.split('-')[1]; | |
| chrome.tabs.query({ active: true, currentWindow: true }, function (tabs) { | |
| chrome.tabs.sendMessage(tabs[0].id, { direction }); | |
| }); | |
| }); |
The chrome.tabs API documentation can be found here. All that header basically ensures that the background script is sending a message to the currently open and active GCal window.
Now, we have to receive the message in the content script. We’ll use chrome.runtime here:
| const container = document.getElementsByClassName('rbGOge SeRypc'); | |
| if (container) { | |
| const containerChildren = container[0].childNodes; | |
| const leftArrow = containerChildren[1]; | |
| const rightArrow = containerChildren[2]; | |
| chrome.runtime.onMessage.addListener(function (message) { | |
| const { direction } = message; | |
| direction === 'left' ? leftArrow.click() : rightArrow.click(); | |
| }); | |
| } |
Based on the direction received, we’ll tell the content script to click the corresponding div!
That’s basically it. If you refresh the extension at chrome://extensions, you should be able to navigate GCal with Alt + Left/Right 🎉
Stick around if you wanna add some UI to your extension.
5 (optional). Popup
Extensions can have a popup when clicked.
Create a popup.html file in the root directory and add this to manifest.json:
| "browser_action": { | |
| "default_icon": "assets/icon.png", | |
| "default_popup": "popup.html" | |
| }, |
The popup is just plain HTML. This is what I made:
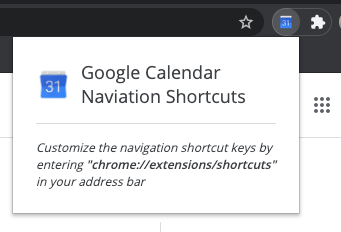 Customized popup interface
The popup HTML code/styling and the entire extension code can be found on GitHub.
Conclusion
In this tutorial, we learned how to add shortcuts to a website via a custom Chrome extension. The methods outlined here can be applied to any website with any shortcut!
In the case of GCal, the HTML class names are just a random assortment of letters — probably the result of bundling. Thus, these could change with different deployments and you might have to update your extension to work with the new DOM structure 😮
Hopefully, this extension helps increase productivity. If anything, it’s super quick, easy, and fun to build from scratch. If you got lost along the way, check out my GitHub repo. You can also install the version I made with the instructions in the repo README.
Thanks for reading. Happy hacking!